Tuesday, November 30, 2010

Tuesday Tip

Glitter your nuts! I first tried this craft more than a decade ago.  I am quite certain Martha Stewart put it into my head. What I can't tell you if it was from her show or her magazine. It was one of her few crafty creations that I thought I could actually do. Not the usual laborious kind of craft where you need 10 people to actually pull it off type that she is known for. But a super simple one that brings back memories of grade school projects using glitter and glue.


Glittered nuts!
  Even though I'm a grown-up, I love glitter, fairy dust, shimmer whatever you call it. There are many types of glitter. For this project, over the years I've experimented with different types. Don't use course glitter or German glitter. The first doesn't look good and the second is too expensive and will tarnish. To get the best results use very fine glitter. Martha has her own line (at Michael's) now, which saves time hunting around for the right type and color.  This year I am doing glittered nuts for hostess gifts. And, hopefully a few batches for my house. My goal is to do enough to fill a hurricane...we'll see if I get it done!


Copper & greens look wonderful in a simple glass dish.
  What you need: craft glue, glitter in 2-3 colors, wax paper and plastic containers. Disposable gloves if you don't like getting glue all over your hands.


I bought glitter on clearance and used all but 2 colors.

Martha makes a glitter glue that I decided to give a try. I'm pretty sure it's nearly identical to regular craft glue, but I liked the fact it came with it's own brush attached to the lid. My daughter helped me and just used a small artist brush I already had to dip in the glue. This is a great project to involve kids. It's a bit messy and holding the nuts to apply the glue can be tricky. You will also need several small Glad containers to put each color of glitter in. Lids if kids are involved. Let each person work with one color on a wax paper placemat.
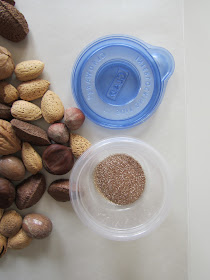


Container to drop glue coated nut into glitter
 

Step 1: Select your nuts. Use a variety of sizes and make sure there are no open seams or pieces missing. Especially check almonds. They have a more delicate shell that tends to chip. Any rejected are perfect for eating!

Step 2: Pour about 2-3 tablespoons of each glitter color into a container. Replenish as needed, but don't start out with too much because it will get caked up with glue bits.

Step 3: Brush the nut with craft glue. Don't glob it on (I know easier said than done if kids are involved) but do coat the nut completely.

Step 4: Put one nut in the container at a time, pick up the container and swirl it around until the nut is coated in the glitter. (I've tried using larger containers and multiple nuts, but they either stick together or the layer of glitter is too shallow to coat the nut.) If kids are involved, put the lids on and tell them to gently shake it. Once the nut is coated, push it out onto the wax paper with a toothpick. I don't recommend the kids do this part because they will either dump the glitter from the bowl or use their fingers to get the nut out which will remove the glitter.


Dry on wax paper

Step 5: Let dry several hours or overnight. Put in bowls or hurricanes to decorate or cello bags to give. To store, just dump them into a plastic bag and pack them away with your holiday decorations.


These are about 10 years old!

They are missing some glitter, but still look good!


New version and colors.

 I am still experimenting with color combinations and whether I prefer the glittered nuts combined with the natural nuts. What do you all think?

Alternate tip: Spray your nuts silver and gold. I've done this too. I don't think it's any faster because you have to turn ALL the nuts over to get all sides, but still very pretty.

Sunday, November 28, 2010

The New Nutcrackers!

Perhaps tomorrow for "Cyber Monday" you will be shopping for gifts and your list calls for something useful...but not ordinary.  Nutcracker tools come in all shapes and sizes. Some are quite decorative, and some are just fun!


From West Elm. A portion of the proceeds of each sale goes to St. Jude's.


The rocket cracker. For the gadget obsessed.


I've never seen a quacker cracker?


Olive wood from Chef's Gadgets. Unique and compact.
 
John Deere.  For the big boy in your life.


From Norpro. For anyone on your list who's a bit uh...squirrely!


Fletcher from Ralph Lauren.  Wonder if he can fetch a nut too?

The Hillary. A 21st century classic nut buster!!!


 I plan on buying one of these...care to guess which one? Which is your favorite?

Friday, November 26, 2010

Advent Calendars

The first Advent calendar was introduced by German Lutherans in the early 19th century to mark the season leading up to Christmas. Most early Advent calendars were of a religious in nature. In modern times they have really become a fun way to occupy children and manage their excitement before the arrival of St. Nick. Most of us are familiar the basic Advent calendar. It typically consists of a cardboard box with a holiday scene and 24 little perforated doors that open to reveal a little chocolate. There are still plenty of those around, but now the choices and styles are endless.

Cardboard  with chocolates 

When my children were babies I purchased red and green hand knit stocking with their names stitched on them. Initially these stockings were hung on the mantle. It didn't take long for me to come to the conclusion I wanted to have something more sophisticated on view. So out of my need for good design our Advent tradition was born as these stockings were relocated to my children's bedroom doorknobs. And, what initially made me feel a bit bad over their removal from the mantle for more stylish replacements, has turned into years of wonderful memories. My children have said on many occasions this has been a favorite part of Christmas. It's been one of mine too as I recall the all the winter afternoons starting on the first of December, when they would get off the school bus, hurry home and race up the stairs to see what was in their stocking. It was always the smallest item such as a package of stickers, candy, a Hot Wheel car, tiny doll, holiday pencils, etc....But it always brought smiles and again accomplished the task of managing excitement before the big day!

As my children got older and it became a challenge of what could could go into those stockings. A modification was in order and fortunately without any protests, the new tradition became the 12 Days of Christmas stocking.   The stockings still go on their doorknobs and I no longer manage to get 12 days in, but they still check and will randomly find candy, an ornament or an iTunes gift card inside! And, I know they will be happy to carry on this little tradition as long as they live at home...and I will too.

If you're looking to start your own tradition, the choices are endless!!! Here are several wonderful Advent calendars that I've come across this season:


This reminds me of the one from the "Christmas Vacation" movie!
 Sources: Pottery Barn, Garnet Hill, Viva Terra, Pottery Barn Kids, Room Service Home 

Tuesday, November 23, 2010

Tuesday Tip

Toss your nuts! Remember when I said scattering your pumpkins across your table or buffet was the easiest thing? Well, I think I may have lied! Emptying out a bowl of nuts was in fact the easiest thing I have ever done to decorate a table. Flowers would have been nice and most welcome. But I decided not to dash out and spend any money and to use only what I already have and still come up with a new, but simple, variation of the Thanksgiving table.


This year we will be having a casual dinner for four. I started with a simple linen tablecloth and then layered an aqua and taupe Pashmina over it. I have many of these from my husband's travels. Some go to friends, some I wear and some I use to decorate!


I used my rattan chargers, simple bone china and seasonal leaf plates. Then added  two types of glasses, glittery copper candles, my favorite crystal candle sticks (I like to use 5, it reminds me of a small candelabra) and vibrant teal blue napkins. I think it's festive and ready for turkey and all the trimmings!


Wishing you all a very Happy Thanksgiving!

Monday, November 22, 2010

Falling Leaves

We have several large trees in our backyard. It was one of the reasons we picked this lot when we were house hunting way back in 1993. The other things that drove the final selection were the two other "must have" criteria: the house must located on a cul-de-sac and no sidewalk in front of the house. Why does that matter? Because my husband had the good sense to know that not only would it give us a larger front yard, it would reduce the chances that our lawn would become the port-a-potty for the neighborhood dogs, but instead a place for our then toddler son and yet to be born daughter to play!


Autumn 2010-view from the kitchen
  He also thought about the angle of the sun in relationship to the front and back of the house. This site was perfect to get the afternoon sun in the back of the house. This was highly desired since the kitchen, living room and library are all located in the back. The trees provide fantastic shade in the spring and summer, keeping things cool. In the fall and winter the scenery changes dramatically. The display of color with the turning of autumn leaves and the white snow that, nearly every winter, blankets the yard provide beautiful views.


Winter 2009-view from the library
  The down side to all these trees? Raking up all the leaves, of course! I attempted to handle some of it over the weekend. I had a few helpers. One of whom turned out to be a great big hindrance. I'll be making a call for assistance this week, otherwise I fear this pile will still be here in the spring. 


Oh sorry, did you just rake this pile?


I think I lost my ball in here somewhere?
  

Got it! Wanna play?
 

Busy day. ZZZZZZZZZ!


Thursday, November 18, 2010

Michael Aram's Perfect Gifts

I spent today on the run trying to get a few more things knocked off my list. I took a little detour  through Nieman Marcus. It was suppose to be a quick spin. It turned into an hour of gazing, touching, and fantasizing. That all turned into a crush. Meet Michael Aram!


Maybe you've already heard of him. Not me. But the minute I saw this beautiful menorah in the store, I started to connect the dots.  Raina of  If The Lampshade Fits did a "One Dozen Magnificent Menorahs" post recently and I declared this one as my favorite:


When I got home, I jumped on the computer and spent another hour looking at everything on his website! Serious crush. I know I said I don't want to push Christmas, but my evening is going to be spent writing about my crush.

Dearest Santa,
I have been the best girl ever!  You must know I would never make anything up that wasn't absolutely true. Okay, maybe there was a moment or two when I could have been better...done better, but I hope you will forgive me and not put me on that other list!  Anyway, I found several pretty, shiny things that someone very talented created. I really like them all. I would be so very appreciative if you could find room in your sack for just one. There will be room under my tree and I'm attaching some pictures for you to see!!!

 The attachment...

Pear S&P Shakers

Double Nut Bowl

Magnolia Candle


Glass Pomegranate Bowl


Ice Cream Cooler


Cheeseboard


 To gather ideas for your own letter to Santa, click here to get started!

Wednesday, November 17, 2010

Guest Blogging!

Today I am guest blogging! My bloggy friend Sue, author of the always stylish and super fun blog the Zhush, invited me to participate in her series called Fabulous Fall Finds!  
  

Please stop by to say hello and see my finds for the home and yourself!

Tuesday, November 16, 2010

Tuesday Tip

Go natural! Assemble a ten minute seasonal arrangement. For those who may not have time or desire to  fuss over arrangements for the Thanksgiving table or buffet, this is one easy solution.

Gather up your pumpkins & gourds place them randomly on a runner or tablecloth add some vines and candlelight.  Fresh picked autumn leaves and nuts would also be a nice addition. Might give the kids something to do too!


I've had this up for a couple of weeks and it still looks fresh. It's perfect for a buffet or a long table. I 'll likely need to take another 10 minutes next week to relocate it to our small butler's pantry so I can set the table for dinner!  Next year, I think I'll try assembling this with only one hurricane on a tray. That way I can just pick it up and move it anywhere!

Care Tip: Never leave a pumpkin on a wood surface for any length of time. They are full of moisture and you will likely find mold or a stain when you remove it! If you want to put it directly on wood, make a little trivet by cutting out a round piece of paper towel layered on top of a piece of foil.

Quick Tip: Don't have any vines in your yard? Take a small grapevine wreath and pull it apart. Do this outside otherwise you'll have a big mess to clean up!

Tip To Self: Make sure picture frames are straight and image is centered before taking the picture...oops!