Tuesday, November 29, 2011

Tuesday Tip

Don't make yourself nuts looking for the perfect tree skirt!

What are these? A couple of throws, a cashmere scarf and a feather boa right?

Who can forget how Linus taught Charlie Brown all his little tree really needed was a blanket to give it some holiday magic? Unless you have been fortunate enough to have a tree skirt made especially for you, I am betting some of you may an issue or two with skirts, like I do!
A white feather boa on a white feather tree, why not!

I've a had a few skirts over the years and some were quite expensive, but I never loved a single one! I now have only one and if not for the color, I wouldn't even keep it. Most skirts that I purchased over the years were either the wrong size or nothing special. Most loomed on the floor like giant saucers and always seemed to be in the way of the hearth, a chair leg or the vacuum cleaner! And the tedious "adjustments" the skirts needed every time the tree got watered drove me nuts.

I won't be using these colors this year, so I'd better check to see what's in the linen closet
 or maybe choose some fabric leftover from a project!
Years ago while trying to figure out how to cover the plastic bases of the artificial trees my children decorated in their rooms each year, I went searching in closets to see what I could use. Thanks to my desperation (and A Charlie Brown Christmas), I have virtually abandoned tree skirts altogether!
A pink throw is perfect for my daughter's little tree.

If you don't have a scarf or blanket in the color you need, a yard or so of fabric will also do the trick. Of course, simple burlap is perfect for all styles. Don't sew? No problem, just fold under the edges, or use a rectangular tablecloth in a pattern or solid that you love!
Linen, silk or faux fur are this year's possible contenders for a quick tree skirt option.

Tiny Tip: Whatever item/material you choose to use for the skirt be sure it's either washable or something you can part with in case it acquires some sap...or someone overfills the tree water!

Partridge in a Pear Tree nestled in an antique urn- so easy!

No Fuss Tip: I think a live tree in an old iron urn, basket, galvanized bucket or decorative planter looks spectacular and no skirt required!

All photos from Christmas past courtesy of A&A.


Monday, November 28, 2011

Merry Click-Mas!!!

While I don't participate in Black Friday, this year I'm finding Cyber Monday hard to resist. It seems everyone is pushing out coupon's and deals today, even my local tile shop!!!


As soon as I take my daughter to school, I plan to grab a cup of coffee, sit down with my Christmas mouse and start clicking away to such sites as Etsy (me, friends), J Crew (the teens) and Amazon (Mr. A&A).

How about you?

Tuesday, November 22, 2011

Tuesday Tip

Prepare to make this the year that you finally organize your holiday decorations! Last January, I wrote a post about how I finally found (and completed) a system for packing and storing my holiday decorations.

Some of you left comments and emails indicating this information would be more helpful if the reminder came before Christmas!

I know many of you will be pulling out boxes and bags of ornaments and decorations from your attics, basements and closets, the minute the Thanksgiving dishes are cleared! As you do this, keep 3 things at an arms reach.
  • A piece of paper: to list the specific items your current storage system is lacking.
  • A box: to put all the decorations you no longer like or use. Pass them to a friend or put the box right into your car for a quick drive to the nearest donation center Monday!
  • A trash bag: for anything broken or damaged. 
Once you've done that, working from your list, order the items you need to store what's left! Everything you want to know about how I organized my holiday decorations including where to buy great storage containers can be found here.

Wishing you all joyful results!!!

Sunday, November 20, 2011

Kitchen Demo Day: Tear Down That Wall!

Last Wednesday, was the beginning of one of my favorite parts of the design process: demo day. Or in this case, it was 3 full days. Much of that was spent scrapping up 3 layers of linoleum in this kitchen and one layer under the carpet in the basement. Watching a renovation project get under way after so much planning is always thrilling!

Demo day 2
Goodbye light stealing wall, silly door and ugly useless bulkhead. 
The first time I showed the unbelievably scary first impressions of this entire house was here. The condition was even worse than my clients had originally thought. By the time 2012 rolls around, the hoarding and not so groovy 70's will be a distant memory and the house will be ready to ring in the new year with some much needed 21st century style!

Before
The new kitchen won't have faux wood grain counters, mushroom lights or....

a trash compactor! The appliance layout is going to change...along with everything else!!!

I'm excited to see work on the kitchen, in particular, get underway. The crew was making great progress and by Friday afternoon, in addition to the kitchen demo, they were already cutting the wood to frame out the new bathroom on the lower level. Oh how I just love the smell of freshly cut lumber!

Thursday, November 17, 2011

Sometimes, I Miss The Obvious...

If you're a regular reader, you know my mantra is Live Beautifully Everyday. Every once in awhile I look around my house and spot something that says just the opposite!


Each time my husband or I needed to read the fine print on something (gadget instructions, recipes, etc...) out came this hideous thing:


And, when my husband was done with it? Naturally, he'd leave it in whatever room he was last using it, despite my protests reminders. If I found it lying around? I would shove it into the nearest drawer so I wouldn't have to look at it. The problem? Neither of us could find it quickly when we needed it next!

It's amazing it took so long to figure out such an obvious solution! Last week while visiting a favorite shop, we bought this:

Serves the same purpose, but is far more chic.  Now it can be left in any room without offending my design sense!
Hmmm, wonder if I should start a new collection of these??? Would be the perfect stocking stuffer too!!!

Speaking of chic, one of my favorite bloggers and designers created this as his calling card:

Grant was kind enough to send me several boxes to add to my extensive matchbook collection.


Whether it's storing all the remote controls in a beautiful box or tossing some matches in a pretty bowl, one little change can have such a pretty impact!

I still prefer matches for lighting candles (except when I'm racing around just before a party,
 then I'll get out the ugly igniter) since they're pretty and convienent,
plus it's like a trip down memory lane looking at some of these boxes! 
So look around your house and see where you might need a little chic update...just before the holidays!

Monday, November 14, 2011

Men In Trees, Falling Leaves and...

A new fence! 
Complete with new gates that actually close.
 The old gates were so rotten and off kilter, we had to use a bungee cord to keep them closed!

Anyone who has owned a home for a long period of time or lives in an old house is very familiar with the expression "It's always something". Our house turned 18 last month. There are days when I feel like my title should be The Domestic Slave and the Chronic List Maker.

One of the best parts of our backyard is all the beautiful old trees. Last month, we took care of pruning
 many large limbs that were damaged or too close to the roof and eliminated some to let in light below.
The last time we did this was in 2006. It's always amazing to watch these guys work.
First they climb a roof height ladder as far as they can, then orchestrate the limb cutting with start a series of
 ropes and pulleys that they are hooked up to as well as use to lower each large limb safely to the ground.
Talk about hard work and dangerous!

This is what's on the To-Do list for fall 2011:
  • Trim backyard trees branches away from house.
  • Remove 2 trees in backyard to allow more sunlight and allow the ground to dry out faster.
  • Remove 1 tree from front yard due to storm damage.
  • Install new fence.
  • Get quotes for a new deck!
  • Mulch front beds.
  • Clean out gutters.
  • Rake leaves, twice!
  • 
    And the down side to having lots of trees...lots of raking!
    
  • Power wash house
  • Paint house trim
  • Paint front porch columns
  • Paint front door
  • Clean outside windows
  • 
    The help around here is prone to taking extra breaks...
    And, that's just the outside. We won't get it all done. Bet you know what happens next? Yep, it ends up on the Spring 2012 to-do list!

Tuesday, November 8, 2011

Tuesday Tip

Get a head start on your holiday meal planning. I have a confession to make. Although, I love the holidays and entertaining, the menu and meal preparation part of it...well let's just say it's my least favorite aspect. I prefer the decorative parts. Making the table look good, coordinating which platter and serving pieces go best with which foods, trimming the tree...that sort of thing.

The goal.
This admission would come as surprise to many of my friends. Try as I may, I am no Martha Stewart. I can't do it all, look flawless (or even decent) and maintain my holiday spirit. What I can do is fake it quite well by exerting a good bit of effort,  planning ahead and taking help when it's offered. Just as long as the help is served on a pretty platter! The other help comes from my double ovens and 6 burner cook top. I worship these two appliances every holiday seasons.


The reality.
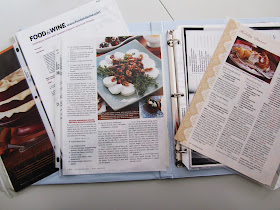
I use a notebook with pockets to start collecting possible contenders. Be sure to add
a few pieces of paper for notes as well as a place to start the grocery shopping list for ingredients! 
I've already started combing through holiday recipes for Thanksgiving, Christmas and New Years. I'll rely on favorites, but always feel compelled to try a few new things every year. I pull recipes for every possible scenario from dinners to brunch to impromptu get-togethers. It makes me feel in control, like Martha.

RX for holiday planning. It's important to feel relaxed don't you think?

Extra Tip:  No one enjoys being at a party where the host or hostess appears frazzled or distracted and unable to mingle with their guests. Seriously, stay out of the kitchen as much as possible!
And, be sure to have fun at your own party!

Your family will also enjoy the holiday season more if you're enjoying it with them. It took me many years to get a system down and figure out that if I tackle the holiday "chore" that stresses me out the most, everyone benefits including me!

Friday, November 4, 2011

Pantry Makeover Complete!

This may not be the pantry of my dreams, but after using the space the past 3 weeks, I'm happy with the outcome. I'll continue to fantasize about large walk-in pantry's with storage for food, small appliances, platters, linens, candles etc...but for now those will remain separate cupboards in areas of my kitchen and my small butler's pantry. The original plan was to install wood shelves, but I had second thoughts for two reasons: time and flexibility.

Good thing I didn't take the plunge with wood just yet, because even after carefully measuring everything, I've adjusted the shelves twice to get it working perfectly for my needs.

Testing, testing before the 2 remaining brackets are added. You may notice
they are not evenly spaced...far more important to hit 2 studs!
 I went from 5 fixed 13" deep vented shelves to 6 adjustable 10" laminate shelves from Home Depot. The shelves are almost in the reverse order of what they once were. The top shelf was moved up eliminating some of the wasted space towards the ceiling. I can access the canisters without a step stool and tearing off a sheet of foil on the bottom shelf just got a whole lot easier! 
Before

After

Two of the worst things about the previous shelves were that things fell through the slats and items toppled over daily. In addition, the vinyl coated shelves had a 2" lip making it impossible to take a tall item off a shelf, such as a bottle of oil, without first tipping it to clear the lip and/or taking several other things out first. Bonus: this is the first time we have been able to store large boxes of cereal upright and not on their sides!

Real life and dim light, but I was determined to finish this post today!
The selections are better around the holidays...maybe I should have waited to post? Kidding.
Technically, it's now a walk-in pantry. Losing 3" of shelf depth allows me to step inside and shut the door.
I'm not sure if it's sad or weird that I tried???
I still have plenty of room on the bottom for a wood crate on casters that I use for Costco trips and a place for the dog food container.  I did buy new canisters for flours and sugars from Target. The paint I had on hand (Pratt & Lambert Seed Pearl in semi-gloss) left over from another project. I bought the 3 acrylic tiered shelves several years ago just for this project and can't recall where they came from. All tallied, this little project cost just under $100!!!   
These acrylic tiered risers are the perfect solution for storing can goods.

Finally, I can reach all my can goods. It has made doing the grocery list easier seeing everything at a glance.

I do plan to add french doors, which should have been done with the rest of the kitchen reno. The current single door drives me absolutely nuts! I've been dreaming of something pretty for years to enhance this little space that I go into several times a day.

As much as I love my readers and want to inspire you to get organized,  I wasn't willing to "stage" the
shelves of my pantry for a pretty picture. I should have painted the crate on casters,
stenciled the word PANTRY on it and posted that! Maybe later...
 My contractor has the measurements for the new doors. I just need to decide if the glass will be frosted or clear, in which case I will hang fabric that matches the other french doors leading to the deck. Oh, and I need to pick out some great hardware, then perhaps I can respectably call it a walk-in pantry!